And gambling? Who said gambling is illegal in Japan? Betting on horse races is not only legal, it is fully machine-automated. The Japan Racing Association (JRA) which runs it all is overseen by the Ministry of Agriculture, Forestry and Fisheries. You can bet either at the tracks, or remotely from a local Wins facility (http://jra.jp/facilities/wins.html) or even on a mobile app. The legal age to buy a ticket is 20, but with betting done on anonymous, automated machines I suspect the enforcement rate is less than perfect.

Kyoto Racecourse
Horse racing has the heart of its popularity with men over age forty. That much is clear from the very, very racy adult-video and adult-services ads found near the back of the horse racing “sports” newspapers sold at every single convenience store in the country. But that doesn’t stop groups of young girls, old ladies or even whole families from enjoying a day at the racetracks. Like going to a concert or baseball game, horse racing is a legitimate weekend excursion and if you don’t get carried away with betting, it’s also easily one of the most affordable all-day activities in the country (admission to a racetrack is a nominal 100 or 200 yen, depending on the location).
So, how accessible is keiba for foreigners? Obviously if you just want to enjoy the atmosphere and the races you don’t need to know a thing, but most people will want to bet at least a couple hundred yen.
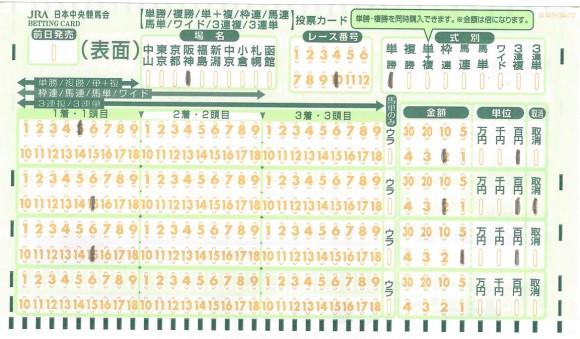
Don’t expect much in the way of English signage or instructions, but to fill out the betting card, you’ll only need to recognize the sections of the betting card and a few key kanji terms, which I’ll explain here. There are a few different kinds of betting cards; I’ll introduce the easy one.

Location
You must specify which racetrack’s race you want to bet on. This is necessary because on a given weekend, either two or three of these locations will be having races. You’re not limited to betting on the races at your current course and there are plentiful monitors with constant live coverage of any other locations running races. The locations as listed are:
中山 – Nakayama (Funabashi, Chiba prefecture)東京 – Tokyo京都 – Kyoto阪神 – Hanshin (near Kobe)福島 – Fukushima新潟 – Niigata中京 – Chukyo (near Nagoya)小倉 – Kokura (northern Kyuushu)札幌 – Sapporo函館 – Hakodate
There are also many “local” (
Race Number
A day of racing consists of 12 races, starting at about 9am and ending at about 4pm. Races 1~6 are typically for younger horses and not a particularly big deal. The big races start after lunch. Race 11 is usually reserved for the day’s finest horses and biggest prize.
Bet Types
Here you specify the type of bet that you are making, which will apply to all bets made on the same side of the card (on the back of the card you can specify the same type again or a different one). If you’re new to betting the types can be quite confusing, but you’re certainly not required to know all of them. Just pick a one or two types that you like.
単勝 – tanshou – Win (choose the horse to finish in 1st place)複 勝 – fukushou – Place/Show (choose a horse to finish 2nd or 3rd )単 +複 – tanpuku – Win, Place or Show (choose a horse to finish 1st, 2nd or 3rd )- This is a convenience option to buy both
単勝 and複 勝 at the same time. It is still considered two bets so if your bet amount is 100 yen, it’ll cost 200.
- This is a convenience option to buy both
枠 連 – wakuren – A “frame” bet. Chose the frames of the 1st and 2nd place horses in any order.- Horses in a race are divided into “frames”, typically of two horses, and they share a color. So for example frame 1 would usually mean horse 1 and 2, frame 2 would be horse 3 and 4 and so on. This option is not particularly popular.
馬連 – baren – Choose the two horses to finish in 1st and 2nd place. (Quinella)馬 単 – batan – Choose the two horses to finish in 1st and 2nd place, in order. (Exacta)- ワイド – “Wide” – Choose two horses to finish in the top three.
- 3
連 複 – sanrenpuku – Choose the top three horses in any order. (Trio) - 3
連 単 – sanrentan – Choose the top three horses in order. (Trifecta)
Of course, the specificity of the bet and the odds of the particular horse determine the payout. 100 yen on a
Horse Numbers
This is where you choose horses to bet on. Depending on your bet type, you will mark up to 3 horses per row. Because this is the simple card, you can only make one bet in each of the four rows on this side, and they must all be the same bet type.
Bet amount
Be very careful not to make a mistake here. ![]() Choose a number and then a factor.
Choose a number and then a factor.
So to bet 300 yen you would fill in the 3 and the
Cancel bet
If you made a mistake or changed your mind and want to cancel a specific bet but still use the card, check this box.
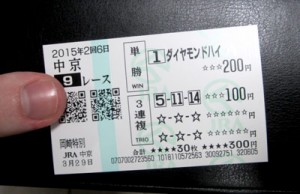
Here’s an example of a completed betting card:
This card would bet a total of 300 yen, 200 on horse #5 to win, and 100 on horse #15. Notice how the 200 yen bet on horse #15 is canceled.
Once you’ve finished your betting card, using the machine is a breeze. It might look a little confusing but here’s the breakdown (machines can vary slightly from location to location):

Insert money → Insert betting card → Machine does the rest
The only caveat is that if you don’t give it exactly the right amount of money, you need to press that green
If you made a mistake on your betting card, the machine will beep and spit it back out at you, which can be confusing. However, worry not because helpful attendants are quick to come to your rescue even if you don’t press the call button.
If everything worked correctly, your betting card will disappear forever but that’s okay because you can’t claim with it anyway. Just don’t forget to take your ticket! Which will look something like this ↓
If you win, you can insert your ticket into the appropriately-sized slot of any machine marked for
Other considerations when visiting the racetracks
There will be a food court, maybe some in-facility restaurants and probably outdoor food trucks/stalls or bento vendors, but prices are above average (not gouging, though) and the food is not particularly mouth-watering, so consider bringing food or drink from the outside (race courses allow you to bring in whatever you want, even beer).
Similar to doing hanami in the park, it’s common to bring a small tarp to sit on, especially on crowded days (= days with G1 races). Once you’re set up, you may come and go from your tarp freely and can reasonably expect other spectators to respect the area as taken–hooray for Japanese courtesy. You’ll notice that almost all actual seats are either in use or have some newspaper or something on them; a seat with anything on it (usually an unattended keiba newspaper) is considered taken.
Speaking of newspapers, if you can read some Japanese and are not adverse to a few nipples, consider picking up one of the horse racing newspapers from a convenience store before you go. The cheaper papers run about 140 yen and contain lots of information on the horses and predictions from “experts”. You’ll get the most out of this if you have someone with you to explain what all the data means, though.
Although about as reliable as spinning a cucumber to decide which horse will win, newcomers to horse racing generally take notice of the expert’s marks in the newspaper, which include:
◎ : favored to win
○ : also has a good chance to win
Any other symbol (△▲×☆, etc) basically means the same thing: the horse could conceivably win, but is seen as less likely than the horses marked with ◎ or ○. There is no bad mark, so any mark is better than none at all.
Useful links
JRA homepage: http://japanracing.jp/en/go-racing/jra-racecourses/index.html
JRA official english betting guide: http://japanracing.jp/en/go-racing/jra-howtobet/pdf/how_to_bet_en.pdf
And that’s all you need to know to become a Japanese horse racing addict!
I’m joking, of course. Just like going to a casino you should play to have fun, not to make money and keep yourself under control. ![]()

Introducing Nihongopedia, Nihonshock’s first iOS app. Nihongopedia is a powerful, expandable study companion for Japanese learners. The app’s content will grow over time through both official releases and (hopefully) users sharing their own creations. The app has two primary functions…
STUDY DESK
A robust personal library of information on grammar, verb forms and conjugations, particles and whatever else the user wants to add.
FLASHCARDS
A straightforward, intuitive and powerful tool for mastering Japanese vocabulary. (or any other language, for that matter!)
The app comes preloaded with information suited to Japanese learners at the JLPT N5 test level (beginners), but users can easily add their own topics and flash cards, or import data that others have shared.
Nihongopedia will periodically release new content for the app, which users can access via the “Discover” tab.
FEATURES
- Well-organized and detailed information on a variety of topics.
- Plenty of clear, helpful examples complete with pronunciation guides and useful tips.
- Flashcard functionality. (the app is preloaded with Hiragana, Katakana, and JLPT N5 Kanji decks)
- Full user freedom to add and remove content.
- A variety of settings designed to tailor the app to the level and personality of the user.
- Import and export data.
- Automatic and manual data backups.
- A sleek, minimal design that’s easy to grasp. (and not embarrassing to use in public)
- A dark color theme. (so you can enjoy your flashcards at night without squinting)
Check it out!
See it on the App Store – Nihongopedia official site – Nihongopedia official Twitter account
]]>I bet you’ve heard Japan is an expensive country. In many ways it is, but not everything has to cost you an arm and a leg. In this article, I give some of my favorite tips to either save money in Japan, or to get more out of your money.
Get Cheap Airfare
I won’t go into this too much since saving on airfare is a general thing, not a Japan thing. If you’re looking for how to save on airfare, I’m sure there’s a ton of other articles out there. I will share a couple of tidbits from my own experience, however.
Delta and Air Canada have handy price grids showing the cost of the ticket a few days before and after the specific dates you search. The cost variation can be very significant. Knowing which days are cheaper is good info, even if you end up flying on another airline.
Also, I’ve found that airfare aggregation sites like Expedia, Priceline and Travelocity are good as a starting point for your search, but you’re usually able to get the same ticket for cheaper if you buy it directly from the airline.
Get a Good Exchange Rate
Japan is still largely a cash-based society, meaning your average restaurant or souvenir shop will not take a credit card; plan to use cash for almost everything. Worry not, though, since Japan is also probably the safest country in the world to walk around with a load of cash.
However, if possible (and if your credit card offers a fair exchange rate) it’s a good idea to pay for your lodging with your card. This is primarily because you will need cash for just about everything else.
The best way fill your wallet with yen in Japan is to exchange cash at the airport right after you arrive. There are ATMs at post offices and convenience stores that allow you to access cash, but you won’t beat the airport rate by more than a percent.
In the US, we have the perception that everything is a rip-off at airports, but in the case of Japan this is actually the most convenient and reasonable place to convert your currency. Check out the current rates you’ll get at Narita airport here: http://www.narita-airport.or.jp/exchange_e/ and if you want to have a good laugh, call your bank and ask them what rate you would get if you ordered JPY from them.
Weekly/Monthly Mansions
(Note: in Japan, the term “Mansion” (マンション) is synonymous with apartment. It certainly does NOT mean “big fancy estate with a butler, swimming pool and two tennis courts”)
There are companies that will rent living space on either a weekly or monthly basis, referred to as ウィークリーマンション or マンスリーマンション, respectively. Primarily, these companies cater to Japanese clients who are temporarily transferred to a job location that is too far from their home to commute. However, many of these companies will also rent rooms to foreigners if the foreigner in question either 1) displays adequate mastery of Japanese to be a signing party to a contract or 2) has a Japanese guarantor who will sign for them.
How much can you save here? Last year, I rented a “mansion” for 1 month (including Golden Week, a time when hotel prices often double or triple) in Nagoya for $1050, so basically $36/day (it was a very small one-room apartment). At that price, alternative options would include hostels, capsule hotels or very questionable business hotels. I’ll take the private apartment, please.
Another big bonus to weekly/monthly rentals is that they’re usually equipped with some basic equipment like a refrigerator, hot water pot, rice cooker, microwave and stove top. Many will rent extras such as bicycles upon request (I rented one for about $35).
If you’ve got the Japanese skills or a good Japanese friend to help you, here’s some sites to get you started:
- http://www.good-monthly.com/
- http://www.leopalace21.com/
- http://www.monthly-mansion.com/
- http://atinn.jp/ (this is where I rented from, because they specialize in Nagoya-area monthly/weekly rentals)
Rent a SIM Card or Portable Wi-fi
Depending on your carrier and plan, staying connected in a foreign country can cost a ton. But if you’re flexible, you can pull it off for a lot less than you might think.
For my trip last year, I took an unlocked Galaxy S3 and swapped in a rented SIM card from eConnect Japan. Naturally, while I was in Japan people couldn’t call me at my USA number, but I don’t get any meaningful phone calls anyway. The SIM card cost me $50 for 1 GB of data to use over 30 days. That’s plenty to do everything I usually do on the internet (email, a few Skype calls, Line, maps, web browsing, train searching), and the speed/connectivity is better than I was used to getting back home.
If you’ve got a phone that’s locked to your carrier or also need to use the internet on other devices, your best option will probably be a portable Wi-Fi point.
Japan Rail Pass
Many of you probably already know about the legendary Japan Rail Pass, but this article wouldn’t be complete without mentioning it, so here goes…
If you plan on leaving your arrival city in Japan, you should definitely look into the Japan rail pass. It gives you the freedom to get on and off of whatever JR trains you want (including the Hikari and Kodama bullet trains) at whatever stations you want. In other words, you get almost* free roam of Japan’s amazing rail system.
*: just note that it only works on trains which are operated by Japan Rail. That excludes many intra-city trains (especially subways, which are mostly city-run) and some off-the-beaten-path rural train lines.
It’s glorious freedom, a huge money saver, and hassle saver too since you just show your pass to the station attendant and they’ll let you through the wickets; very VIP treatment. You only ever need to line up to reserve a seat, which is a good idea for long trips or during busy hours, but in many cases you’ll have no problem finding an open seat even on the bullet trains.
Not convinced yet? Here’s some math: the JR pass costs approximately $550 for 3 weeks. If you go round-trip from Tokyo to Osaka twice, you’ve basically gotten your investment back.
Here’s the link to get you started: http://www.japanrailpass.net/eng/en003.html
Save on Food and Drink
Food might be the thing people underestimate the most when they plan their travel expenses for any country. This is especially true with Japan because everything is so goddamn delicious. Here’s some tips that I came up with to keep my food budget down, which served me well when I was actually living there but could also help out a tight-budgeted traveler:
- Buy a jar of Nescafe instant coffee for your mornings. A typical Japanese mom-and-pop cafe charges $2-3 for a cup of coffee (it comes in one size: small) and you won’t get refills. And get it at a supermarket if you can, not a convenience store; the prices are usually very different.
- Supermarket bento (boxed meals) are a great deal, and most supermarkets start discounting their bento 20-50% after a certain time, usually 7 or 8 o’clock at night. Find your nearest supermarket and figure out how to take advantage of this.
- Onigiri (rice balls, usually with some kind of filling) are delicious, cheap and satisfying. The ones you get at convenience stores aren’t bad, but keep an eye out for an actual onigiri shop. A real onigiri is twice as large and three times as delicious as a convenience-store knockoff, and still usually costs less than 200 yen.
- Inari sushi. If you have tried them in the US and didn’t like them, I urge you to try them again in Japan. Like onigiri, these are a low cost way to fill your stomach and can be addictively delicious if they’re made well (in Japan, they usually are).
- Japanese instant noodles are on a whole different level compared to the garbage they peddle to us in the US. It’s almost insulting. Buy a Nissin noodle cup, try it, and cry uncontrollably when you discover just how delicious your college years could have been but weren’t.
Bring Back Stuff to Sell
Put your spare suitcase space to good use! Traveling to Japan means you get to bring some stuff back without paying for shipping. You have to do some research and shopping around, but it’s very possible to do things like buy a Nintendo 3DS in Japan for $100, bring it back and sell it on eBay for $150 (the 3DS is easy to sell because it is region-locked, so gamers need an imported one in order to play Japanese games). Japanese PS3/PS4 games are good for the opposite reason (because the hardware is NOT region-locked, the games can be played normally even on non-Japanese hardware).
Of course if you come home with 10 of the same device or game in your suitcase, there’s a chance that customs will look upon that suspiciously, so don’t overdo it. lol
Do you have any money tips for traveling in Japan? If so, feel free to leave a comment! ^^

It’s been four and a half long years since Nihonshock released its original Basic Japanese cheat sheet, and finally I got around to making another freebie!
Today I’m releasing Cool Japanese, which is less serious than my previous sheets but still packed with lots of great content. I tried to focus on topics that were interesting (even if they were a little obscure or advanced), and writing examples that were not only useful but fun to read. Plus, I sprinkled tons of my favorite vocabulary and phrases throughout. The target audience is JLPT level N3-1, but beginners will probably find something too.
There are even a couple Easter eggs in there from Steins;Gate and Fist of the North Star. Can you find them? (^^)
Head over to the Cool Japanese page for the download! It’s 100% free and I encourage everyone to share it with their friends, followers, classmates and study buddies.
Note that this cheat sheet is digital only!!
It is not (and will never be) a member of the printed Japanese Cheat Sheet Pack.
(However, it may–at some point in the very distant future–be a member of a separate set of printed cheat sheets.)
]]>In Japanese, green is the new blue
In ancient Japanese, the four primary colors were black, white, red and blue, and even today the language possesses compound terms for “completely black” (

“blue juice”
Historically, Japanese made no clear distinction between blue and green (green could be considered a shade of blue), and the tendency to call green things blue persists in a number of cases today, such as that stoplights are said to turn blue, not green (
Similarly,
The Japanese word for “green” (
It’s not like Japanese speakers can’t see the difference; when the specific color of a thing is important, all of them can distinguish between blue and green. But generations-old habits are hard to break; so if your Japanese boss hastily instructs you to go fetch “the blue folder” from somewhere and you can only find a green one, don’t be surprised.
Problematic colors
Color exists on a spectrum and color terms in any language are inherently vague; everything other than pure black and white is always an approximation. Therefore, when dealing with terms across two languages, there are inevitably a number of cases where the descriptors just don’t line up like we expect them to, possibly leading to miscommunication.
For example, Japanese “wisteria” (

“Pink” is usually equated to Japanese’s


 All the pretty colors

The bulk of Japanese’s advanced color lexicon is drawn from nature.
Some shades of green tend to mirror very well to English counterparts.
There are also colors based on precious stones and materials;
Japanese also draws some color names from birds. What English speakers would call “olive green” is likened to a Japanese bush warbler,
One notable oddball is
A couple others that are nice to know are
What Japanese colors do you like?
If you think I missed something (I’m sure I did), leave a comment and I’ll try to keep updating this section.

Note:
Conclusion and Further Reading
Having an advanced repertoire of colors in your vocabulary isn’t absolutely necessary, but it does make life more… well… colorful. I expanded and corrected my own knowledge of color (in both Japanese and English) in the course of researching and writing this article, and can proudly claim to be a little bit more sophisticated for it.
If you’d like to see even more named Japanese colors, here’s a couple great links to get you started.
]]>What’s special about Amanohashidate?
 The main attraction is of course that long, straight sandbar that stretches straight across the bay. You’ll want to check out the view from Kasamatsu Park, which is the scenic point on the end opposite from where the train station is; the view is the one you see most often on post cards, pamphlets and such, and getting there is half the fun.
But it’s the plus-alpha elements that really sold me on Amanohashidate. First of all, it’s not overcrowded. I suppose that’s the upside of a location that’s a little hard to access. So many tourist spots around Japan are so extremely dense, lines are long and you just feel rushed. You’re by no means alone in Amanohashidate, but you can explore at your own pace and really have room to breathe.
 There’s a bunch of fun little things to see and do as you tour the area, too. I highly recommend renting a bicycle for the day to get across and back. The ski-lift-style ride up to and down from the overlook is tranquil and adorable, and at the top there’s a hoop that people try to throw clay discs through, great for children and inner children alike. (but I’ll warn you it’s much more difficult than it looks)
 ![]()
It’s interesting to watch all the people bending over to see the view upside-down; supposedly looking at it this way makes it seem like the peninsula is ascending through the sky to heaven. Sure, you could just turn a post-card upside down, but where’s the fun in that?

Of course there are cute tourist shops too. Preserved porcupine fish seem to be a popular souvenir. And there’s a shop that specializes in Japanese (grape) wine, which you don’t usually see a lot of even in Japan. Naturally, there’s nice temple (Chionji) before you cross and a nice shrine (Kono) on the far side which keep the traditional Japanese travel atmosphere alive.


Getting there and back
If you’re starting from Kyoto/Osaka or even Nagoya (provided you take the shinkansen to Kyoto), you can do Amanohashidate as a day trip, but if your base of operations is in Tokyo, you’d better make it an overnighter. Day-trippers should also be advised against trying to walk the sandbar; definitely go for the bicycle.
The 2-hour-long somewhat scenic train ride starts from Kyoto station. If you buy your tickets normally (don’t have a JR pass), there isn’t a problem. But if you’re traveling with a JR pass, note that it only gets you as far as Fukuchiyama station, after which you’ll need 1520 yen each way (but you won’t need to change trains, just pay the attendant that comes through the cabin).
Trains to Amanohashidate leave about once every hour before noon, so no problem there. However, be sure to get a reserved seat ticket and make it clear you’re going to Amanohashidate. Why? The train will split at Ayabe station, and you need to be on the correct train car.
On your return, the train you want is the JR Limited Express Hashidate #10 (JR
If you miss that train, your route back to Kyoto becomes much more confusing, so don’t. Note that this schedule might have changed by the time your read this article, so be sure to double-check before you go.
After leaving the station, it’s about a 3-minute walk to the sightseeing zone. You need to go right for a short distance and then make a 135° left turn, where you’ll enter a nice pedestrian street with touristy shops and restaurants (you’ll want to rent your bicycle from somewhere around here). There’s a map at the bottom of this post to help you figure it all out. Most of the other people who got off the train with you will be headed that direction too.
Tips for visiting Amanohashidate
- Don’t plan too far in advance. Good weather is a requirement for enjoying Amanohashidate. If they’re forecasting rain, cut your losses and try again another time.
- In warm weather seasons, consider bringing a swimsuit!
- There’s a small onsen (public bath house/hot spring) facility right next to the station that’s great for washing off sweat and/or salt water after a day of play or just killing some time and relaxing while you wait for your train. And if you ask, the station attendants will give you a coupon for a small discount at the onsen.
- There’s two major scenic points to view the sandbar from, one (Mt. Moju) is on the same side as the station, but the one I recommend (Kasamatsu Park) is on the opposite side of the bay. The view isn’t necessarily any better, but getting there is so much fun!
- Find a place that rents bicycles for all-day (
終日 : shuujitsu) use, many of the rentals are for 2.5 or 3 hours, which is enough time if you know what you’re doing but not quite enough to really relax and explore. I rented my all-day bicycle from the wine shop for about 500 yen (sorry, I don’t remember the exact price). There was no id check or paperwork or anything, and it’s easy enough to find an appropriate place to park your bike before going up the lift on the other side. I left mine with a bunch of other bicycles at the entrance to Kono shrine. - Bring a bento (buy it in Kyoto)! You’ll probably arrive right around lunchtime and are unlikely to come across any better location or opportunity for a picnic anywhere in Japan. The sandbar is a park and there are tables and seating to use as you walk or bike across. Or you can just set up wherever you like on the grass or sand. And yes, there are even garbage cans! (if you’re in Japan or have ever been, you know finding a receptacle can be a nightmare)
- After going up on the lift (I only recommend the cable car if you can’t lift your feet, since you need to do this at a couple points on the ascent), you can optionally hike up further or take a bus to Kasamatsu Temple. I skipped the temple, but am told it’s quite a hike; unless you’ve got a room in town for the night you’re probably better off with the bus.
Map
Click to enlarge.

The leading whisky producer in Japan is Suntory, which operates two distilleries: Yamazaki (
Yamazaki
 Yamazaki is Suntory’s flagship whisky, which is widely available in Japan everywhere from izakayas to convenience stores. The Yamazaki distillery has access to some of the best water in Japan and utilizes 12 stills (six for the first distilling and six for the second), each with a different design; this is a large number compared to most Scottish distilleries and means they can produce many different variations of “new make” (the colorless spirit that goes into casks for aging).
Like most other distilleries, imported oak casks which were previously used once to age bourbon are used to mature most of the whisky, but Yamazaki also utilizes exotic casks including sherry, Japanese oak (mizunara) and umeshu (plum liquor) casks. The latter is used to age whisky found in my personal favorite: Hibiki (a blended whisky).
Other producers in Japan
Nikka is another company that makes some excellent Japanese whisky, notably Yoichi (
Kirin produces a whisky called Fuji Sanroku (
In addition, there are a number of other smaller, local distilleries around Japan, but the lion’s share of the market is dominated by the brands mentioned in this blog (especially Suntory).
Touring a Japanese distillery
 As a fan of Suntory’s lineup, I recently traveled out to Yamazaki to take a tour of their facilities. It’s a quick and easy train ride from either Osaka or Kyoto and about a 5-7 minute walk from the station. Although a good understanding of Japanese will make the tour much more informative, the distillery does offer English-language accommodation in the form of a headset with numbered recordings and an English pamphlet.
There is a free guided tour which is available daily throughout the year. At the end, you get to sample some of the regular Yamazaki single malt (not the premium aged stuff). If you go through the Japanese-language site, you’ll find various seminars that are offered throughout the year. These seminars offer additional content and usually a wider variety for the tasting portion, but expect to pay a bit for these (about 1500 yen).
 If all you want to do is try some of Suntory’s fine whiskys, you don’t need a tour or seminar. Just head to the gift shop and you’ll find a tasting counter where you can order a 15ml splash of anything they offer. Prices mostly range from 100 to 500 yen for a tasting, but some of the high end whiskys go up to 2400 yen (Yamazaki/Hakushu 25-year, Hibiki-30 year). You can also taste a wide selection of non-Suntory brands like Macallan and Glenfiddich, even Canadian whiskys and American Bourbon.
Getting Japanese Whisky Outside of Japan
The difficulty of obtaining Japanese whisky outside of Japan is a problem I pray will be resolved soon. Last December, I was overjoyed to see Hibiki 12-year at my local CostCo, but it has since disappeared.
Perhaps that will soon change. Japanese whisky has been featured recently on TV news and business programs, and last year Suntory purchased Jim Beam, which could expand their options for international distribution.
On a side note…
Booze in Japan is uber-cheap! I’m talking half-price or less of what you would pay in the US. Check out these numbers!!! (Note that the standard bottle size in Japan is 700ml, which is a shot smaller than the 750ml bottles which probably populate your local liquor store)


You want a bottle of black label? That’ll be $20. Gold label? 45 bucks! …somebody pinch me! Scotch seems to be the best value relative to US prices, but vodka and rum are also very affordable. These pictures were taken at the Nagoya station Bic Camera, which was the cheapest retailer I found. Other locations tended to be 10-15% more expensive.
So remember this: if you’re traveling to Japan, don’t bother picking up any scotch at the airport duty-free shop. You’re almost certainly better off buying it in Japan.
How much duty-free liquor can you take home from Japan?
In the case of the US or Canada, you’re allowed 1.14 liters (= 40 ounces) of spirits. I brought back a 700ml, two 180mls and two 50ml minis for a total of 1.16 liters. Close enough.

For the record, if you’re a beer person you could bring back a 24-pack, or you oenophiles can take 1.5 liters (two regular bottles) of wine. However, you only get to bring one kind of liquor with you; spirits OR beer OR wine.
If you’re in another country and happen to know what the limit is, please leave a comment for others. ![]()
Well, that’s all for this post, thanks for reading. And now…

Many of you have probably noticed that I’m behind on updating my site, but I haven’t forgotten about it or stopped working behind-the-scenes.
It’s been more than a year since I first released Nihonshock’s Japanese cheat sheet pack, and in that time it became clear to me that I needed to take the product just a little bit further.
Therefore, I am now re-releasing it. The regular price will increase from $25 to $27, but in exchange you’ll get one additional printed sheet (Onomatopoeia), and a sturdier lamination than before.
However, since I’m doing a pre-order sale right now, you can buy them for $20 USD! The pre-order price ends on October 17 and they ship on October 18, so get on board now (you know I don’t do many sales)!
Check out the cheat sheet site and this post in particular for more details.
Thanks everyone for supporting Nihonshock and helping to make this possible!
]]>How is this all possible? Japanese is called an agglutinative language (
Many advanced students often complain about the terms “Ru Verbs” and “U Verbs”. However, they’re more correct than other names like “Class 1” and “Class 2”, which are arbitrary and contradictory to the traditional Japanese names.
From a traditional standpoint, there are 5 main classes of verbs in Modern Standard Japanese (
上 一 段 活用 動詞 (見 る,用 いる, Etc.) Kami-ichidan Verbs (roots end in i-)下 一 段 活用 動詞 (食 べる,求 める, Etc.) Shimo-ichidan Verbs (roots end in e-)五 段 活用 動詞 (買 う,待 つ, Etc.) Godan Verbs (roots end in consonants)サ変 活用 動詞 (する) S-row Irregular Verbs (root is s-)- カ
変 活用 動詞 (来 る) K-row Irregular Verbs (root is k-)
There are only two irregular verbs in Japanese now, but there used to be more. However, する is still not alone. In fact, ~ます, which makes sentences polite, conjugates the same way as it.
Despite there being minor differences in regards to the names of the classes, the main differences come from explaining how things happen after the root.
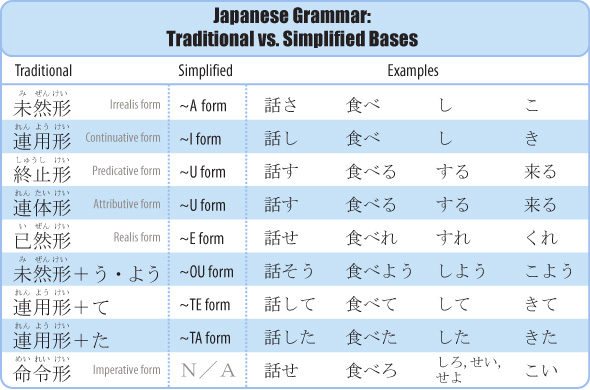
The view used at NihonShock involves a simplified 7 base system.
- ~A:
動 か、食 べ、し(する)、こ(来 る) - ~I:
動 き、食 べ、し、き - ~U:
動 く、食 べる、する、来 る - ~E:
動 け、食 べれ、すれ、くれ - ~OU:
動 こう、食 べよう、しよう、来 よう - ~TE:
動 いて、食 べて、して、きて - ~TA:
動 いた、食 べた、した、きた
This sufficiently accounts for most beginners’ needs in understanding how Japanese conjugates. However, for those hungry for minute details of grammar, you will eventually run into roadblocks with this method.
The Traditional Verb Forms
It’s now time to introduce the traditional base terminology used in Japanese grammar studies. Below are the Japanese names of them along with standard English translations of those names. If you don’t know some of the English words, don’t worry, this post will go over each of them in turn.
未然 形 みぜんけい Irrealis Form連用形 れんようけい Continuative Form終止 形 しゅうしけい Predicative Form連体 形 れんたいけい Attributive Form已然 形 いぜんけい Realis Form命令 形 めいれいけい Imperative Form
So, in actuality, the endings ない, ぬ, ず, う, and よう follow the
What about しよう and
Note: The “OU Base” name in the simplified system could be more accurately described as the “O Base” given that the endings for the volitional are ~う and ~よう.
That’s not all. You also use the
Now, what about the “TE” and “TA” Bases? If
None of the sound changes in
In summarizing this traditional approach to bases, the following chart shows the bases.
| Class | ||||||
| い~ | い~ | いる | いる~ | いれ~ | いろ・えよ | |
| え~ | え~ | える | える~ | えれ~ | えろ・えよ | |
| あ~・お~ | い~ | う | う~ | |||
| し・さ・せ~ | し~ | する | する~ | すれ~ | しろ・せよ・せい | |
| カ |
こ~ | き~ | くる | くる~ | くれ~ | こい |
Endings for
Endings for
Endings for
Endings for
Endings for
Endings for
Note: Remember the
しれる・せれる → される・せられる
しず・さず → せず
To relate the 7 simplified bases to this system, consider the following chart.
The hardest part about this is naturally putting bases and endings together correctly on the spot. But regardless of what methodology you use, you’re still learning Japanese.
One key advantage to learning the traditional base system is that it is not limited to verbs. It applies to adjectives and auxiliaries. To learn more, check out: http://www.imabi.net/thebases.htm.
This post was guest-authored by Seth Coonrod, a 19-year-old sophomore (at the time this article was written) at the University of Texas at Austin. He has been making www.imabi.net ever since he was in 10th grade.
Over these years, his site has become immensely filled with lessons and data on
 The expression ‘hell on earth’ conjures up images of something very unpleasant, so it is unlikely that the expression would be used to draw tourists. However, in Beppu city the expression ‘hell on earth’ is probably the best way to describe what you’ll get. Blistering pools of boiling thermal water, clouds of sulfuric gas, geysers squirting water from deep under the earth’s crust and bubbling hollows of mud are just some of the sites you will see in Beppu.
Should you forget you are in Japan’s very own ‘hell on earth’ the tourist staff will be happy to remind you with their uniforms which read “
 Beppu city is located in Oita prefecture on the island of Kyushu. It is an area of high geothermal activity with eight geothermic hotspots, referred to as ‘the Eight Hells of Beppu’.
If you visit Beppu the Eight Hells are a must see. They are all except for two located in the same area and are within walking distance of one another. You can pay 500 yen to enter each individually but the best way to see all eight hells is to buy a day ticket for 2,000 yen. Each hell is different and has its own unique features.
Shiro Jigoku

The first hell you will likely come to is called Shiro Jigoku or ‘the white hell’. It is one of the more serene geothermic pools featured at Beppu with light blue water and a peaceful Japanese garden.
Umi Jigoku

The second hell is called Umi Jigoku, it is a pond of strikingly blue water, as the word Umi means ocean or sea. The cobalt blue water is offset nicely by the red gate of the inari (good luck) shrine next to it.
Oniishibozu Jigoku

Oniishibozu Jigoku is the third hell, it features a series of boiling mud pools, each a different shade of grey. The popping bubbles are said to resemble the bald heads of demons. Hence the name oniishibozu.
Kamado Jigoku

The fourth hell is known as Kamado Jigoku. As you enter the first thing you will see is a bright read demon standing atop of a giant cooking pot. The more tamable geothermal springs around here were used by people for cooking and also for medicinal reasons. Visitors are recommended to thrust their face into the steam to relieve blocked noses, sore throats or eye allergies.
Oniyama Jigoku

Oniyama Jigoku is the fifth hell. This area is half a zoo, half a geothermal hot spring. You can look at the bubbling pools of geothermal water on your right then turn your head to see crocodiles and hippos in cages on your left.
Tatsumaki Jigoku

The sixth hell called Tatsumaki Jigoku is a geyser that erupts every 15 minutes or so. Both Tatsumaki Jigoku and Chinoike Jigoku are situated some distance from the other hells and it will require a short 10 minute bus ride to get to them.
Chinoike Jigoku

The seventh hell Chinoike Jigoku translates to ‘The bloody pond’. Looking at the photo below it is easy to see how it got its name.
Kinryu Jigoku
Kinryu Jigoku, the Golden Dragon hell was closed for maintenance during my visit. However, should you enter you will be treated by a giant dragon spewing boiling steam from its mouth.
So, no matter what you preference there’s a hell for you in Beppu. To get there you can take the bullet train from Tokyo or Osaka and ride it down to Fukuoka city then transfer to a local train that will take you to Beppu. Another method is to fly straight into Beppu or if you want to take your time a third option could be to take an overnight cruise ship from Osaka and arrive in Beppu recharge and ready to go first thing in the morning. However you choose to go, Beppu City is a must see in Japan.
Map of Beppu’s Hells
Here is a (Japanese-language) map showing visitors how Beppu’s “Hells” are situated:

 This post was guest-authored by Lynden, a university teacher and artist living in Osaka.
Check out his art-related homepage here: http://www.lynden-art.com/