- an active Azure subscription - MSDN or trial or Azure Pass is fine - you can also do all of the work in Azure Shell (all tools installed) and by using Github Codespaces
- PowerShell installed - we do recommend an editor like Visual Studio Code to be able to write scripts, YAML pipelines and connect to repos to submit changes.
- [OPTIONAL] Azure CLI installed to work with Azure or Azure PowerShell module installed
- [OPTIONAL] Windows Terminal to be able to work with multiple terminal Windows with ease
If you will be working on your local machines, you will need to have:
- Powershell installed
- git installed - instructions step by step here
- .NET installed to run the application if you want to run it locally
- Kubectl installed to work with Kubernetes - you can use Install-AzAskKubectl cmdlet
- an editor (besides notepad) to see and work with code, scripts and more (for example Visual Studio Code or NeoVim)
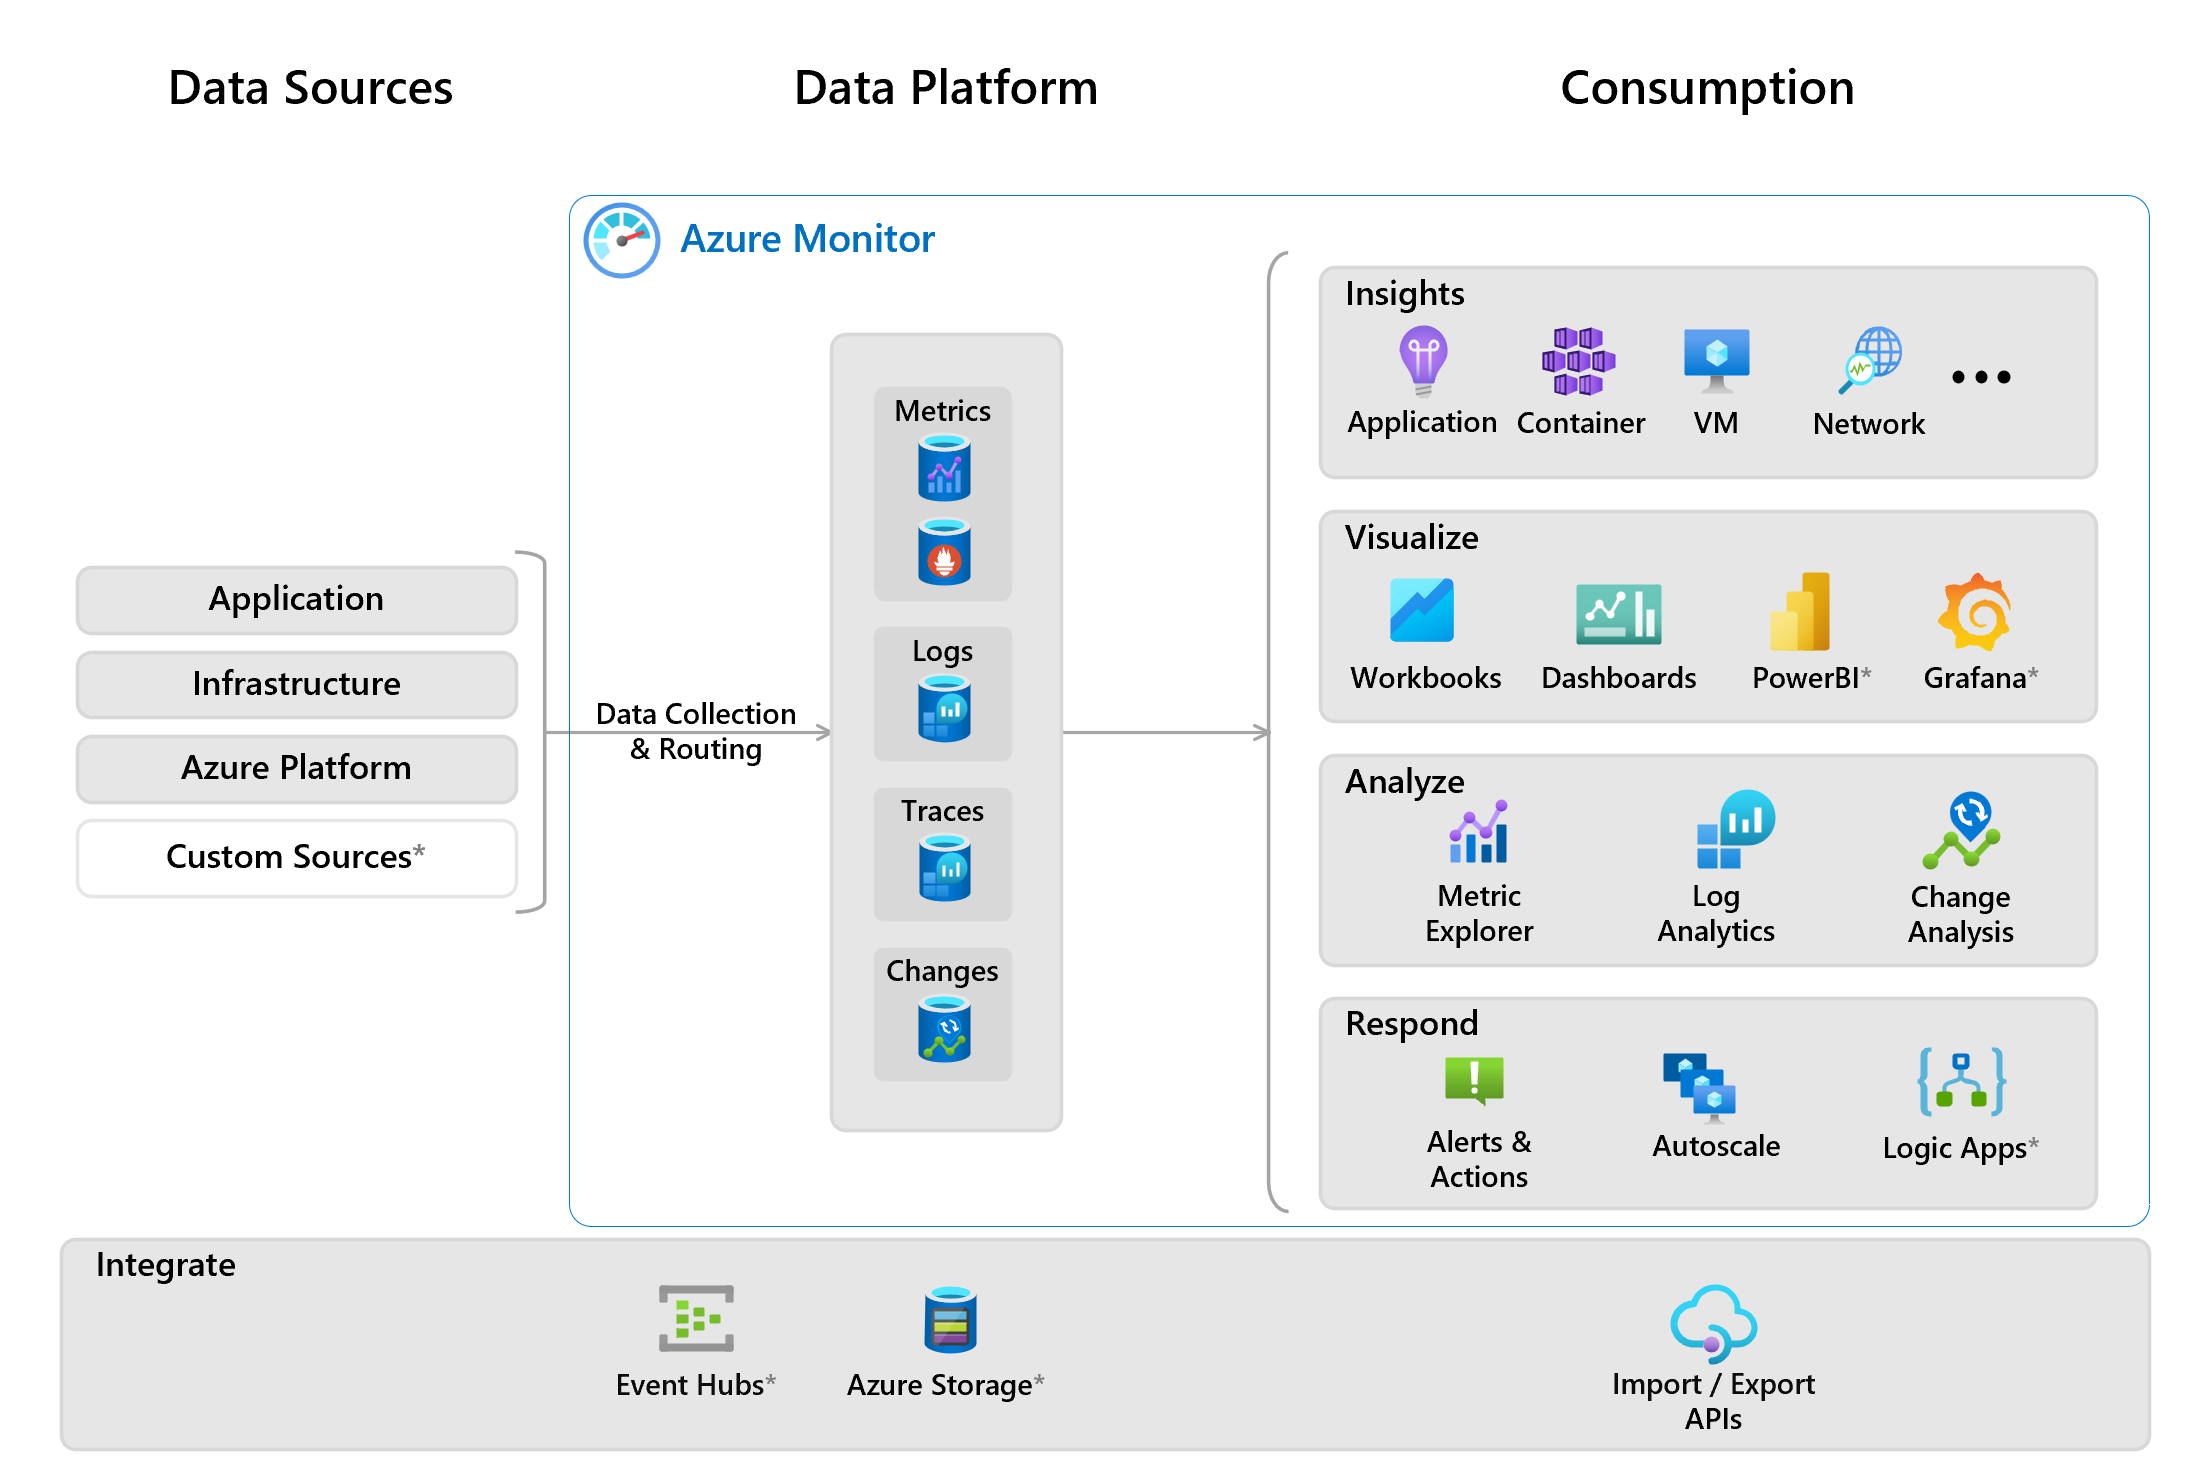
Going through Azure Monitor solution with focus on practical areas:
- Collectors (built-in, ...)
- Storage of metrics and logs with focus on KQL
- Usage in depth (insights, visualization, analyze, respond)
- Alerts
- Change analysis.
Focusing on defining monitoring strategies with best practices on top of Azure Cloud Adoption Framework.
To prepare the environment, you can run the following script in your PWSH terminal:
#to go root folder where you cloned the repo f.e. C:\Work\Projects\azure-demo-monitoring-basics
Set-Location "C:\Work\Projects\azure-demo-monitoring-basics\"
Add-DirToSystemEnv -RestartCurrentSession
Init-Environment -Location "WestEurope"
It will create resource for you to be able to work with:
- Resource group with name and tags (you can change values in parameters file)
- Storage account to store blob storage and to be able to be set as diagnostics source ((you can change values in parameters file))
- Log Analytics workspace with per gb sku (you can change values in parameters file)
- Application Insights assigned to Log Analytics workspace (you can change values in parameters file)
- Virtual Machine with tools deployed and application with SQL installed (you can change values in parameters file)
- Azure Registry to store containers and images (you can change values in parameters file). It will compile containers from containers folder and push them to the registry.
- Azure Kubernetes Service with connection to Azure Container Registry (you can change values in parameters file). After creating the resource, it will attach registry and get connection information and store them to .kubeconfig file to be able to access the cluster. It will deploy newly created containers as deployment inside namespace with public access points.
- Azure Virtual Machine and will install basic web application with SQL, Sysinternals, .NET and other tools to be able to work with the environment.
- Azure Load Testing resource to be able to run load tests on the application.
To connect to the cluster, follow this instructions.
Note: It will take around 1h to setup everything.
To install agent via policy, you can use this definition.
To try out different functionalities we have sample scripts and applications to be able to work with.
To control different settings, you can use environment variables. The easiest way to set them is via PowerShell and his provider option.
When all settings are set, you can run the application with dotnet run command.
Example below:
Set-Item Env:ApplicationInsigths__InstrumentationKey "12345678"
dotnet run
To use Azure Container Apps or Azure Kubernetes Service you will need to store containers to registry to be pulled from.
In our example we are using Azure Container Registry and also their build task options.
Dockerfiles for containers are located in containers folder.
To compile containers in one go, navigate to scripts folder and run Compile-Container script:
Compile-Containers
To modify the deployment, you can configure the following parameters:
- ResourceGroupName - name of the resource group where to store the container
- RegistryName - name of the container registry
- FolderName - name of the folder where you can find Dockerfiles (by default folder containers)
- TagName - tag name for the container (by default latest)
- SourceFolder - folder where to look for the source code (by default src)
- InstallCli - if you want to install Azure CLI (by default false)
For example to build containers with tag 1.0.0:
Compile-Containers -TagName 1.0.0
The easiest way to create environment variables is to store it to file, exclude that file from getting into source control and load variables via PowerShell (as demonstrated below).
Example of env variable inside env file: AuthOptions__ApiKey=1234567890
You can check out docs for dotnet run for more options how to run the app with parameters.
If you want to automate the process, you can use PowerShell script to prepare the environment for you.
Get-Content $PathToENVFile | ForEach-Object {
    $name, $value = $_.split('=')
    Set-Content env:\$name $value
}
Prepare file (example here - rename to .env) and exclude *.env files from putting it to the repo. More here. Open PowerShell and run the upper command by replacing PathToENVFile the path to your file in double quotes.
Integration with different solution and reacting on different items, focusing on:
- Integrating with first party solution (serverless, web hooks, API, ..)
- Observability, recovery actions and SLO
- Integrating with hybrid solutions (on-premises, 3rd party clouds, etc.)
- Traces and custom events with built-in options and REST / custom development
Explaining and using Azure Managed Grafana and Prometheus exporter with Azure Monitor, different sources, and streaming sources.
You can read about different techniques and options here:
- What-The-Hack initiative
- GitHub and DevOps
- Azure Samples or use code browser
- Azure Architecture Center
- Application Architecture Guide
- Cloud Adoption Framework
- Well-Architected Framework
- Microsoft Learn
- Azure Container Apps
- Azure Kubernetes Service
- Sysinternals
- Monitor.Az
- HTMX - htmx gives you access to AJAX, CSS Transitions, WebSockets and Server Sent Events directly in HTML, using attributes, so you can build modern user interfaces with the simplicity and power of hypertext.
- Bootstrap - Bootstrap is an open source toolkit for developing with HTML, CSS, and JS.
This project welcomes contributions and suggestions. Most contributions require you to agree to a Contributor License Agreement (CLA) declaring that you have the right to, and actually do, grant us the rights to use your contribution. For details, visit https://cla.opensource.microsoft.com.
When you submit a pull request, a CLA bot will automatically determine whether you need to provide a CLA and decorate the PR appropriately (e.g., status check, comment). Simply follow the instructions provided by the bot. You will only need to do this once across all repos using our CLA.
This project has adopted the Microsoft Open Source Code of Conduct. For more information see the Code of Conduct FAQ or contact opencode@microsoft.com with any additional questions or comments.