A lot of my video game papercrafts are made using the actual 3D model
from the video games as a base reference, and even though the games I like are pretty old, I still sometimes get questions about how I get those out of the games.
So
last time I figured I'd include a short explanation on how to get the
Tomb Raider Angel of Darkness Save icon Lara 3D model from a
PlayStation 2 savegame file that I used for the papercraft vignette I made of her, since it was simple enough to show with just two or three steps involved.
I also figured I could maybe do so each time I started a new papercraft so people could get an overview of several different methods?
Only this time... There ended up being quite a few more steps involved... 😅
- NOTE BEFOREHAND: I'm using my original PlayStation 2 Kingdom Hearts game from 2002, and I can't guarantee if the tools I mention here work with any other or Final Mix/HD 1.5 ReMIX versions...!
- ANOTHER NOTE BEFOREHAND: I'm using a Windows 10 Home 64-bits desktop computer, and the first time I used this method was on a Windows XP Home 32-bits system. The tools used (and the game itself...) are many years old already and these are the two systems I know they work on obviously (I had to make some settings in my Panda Dome antivirus software to get them to work actually) and again: I don't know whether they will work on other systems...
Extracting the files from the game disc: KHDump
- Now, to start with the obvious
(I hope...): you will need the PlayStation 2 Kingdom Hearts game
(see also the note beforehand above).
- Insert your Kingdom Hearts disc into the optical disc drive on your computer. Then first find the KINGDOM.IDX file on the disc and copy it to a new folder.
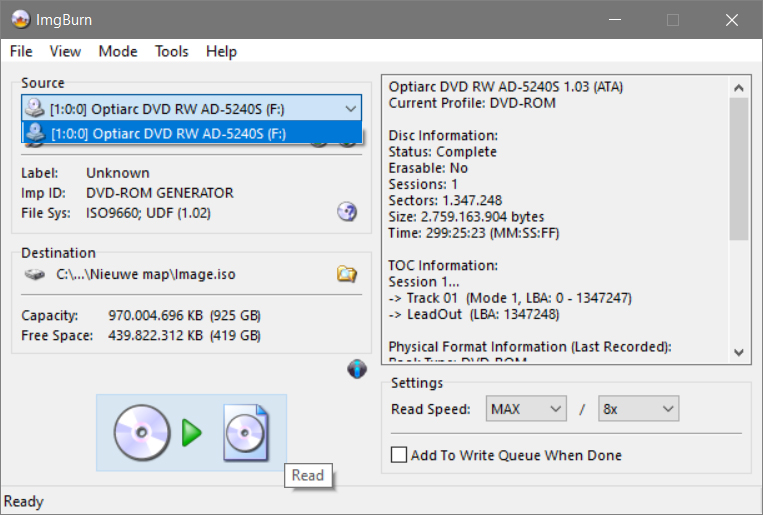
- You will also need to make an ISO of your Kingdom Hearts disc. I like to use and old freeware version of
ImgBurn version 2.4.0.0 for this
(tip: DON'T get the newest version from the ImgBurn website because in later versions, there may be annoying software from advertisers bundled with the installer; if you're not convinced, you can also use a completely different image burner to create an .iso of course).
- Select the option Create image file from disc. Then as a Source, select the disc drive with your Kingdom Hearts disc in it and as Destination, choose the folder where you put the KINGDOM.IDX file. Let ImgBurn do its thing and when you hear the cheerful music your .iso file will have been created.
- To actually extract the Kingdom Hearts 3D model files from the .iso, I use a tool called KHDump by yaz0r. There is an older 0.1 version, but I the KHDump 0.2 alpha1 version seems to manage to extract more model files so I like to use that one. Sadly, it's no longer available from
yaz0r's original blog, but
on the XeNTaX forums there's a link to an archive of yaz0r's tools on
MediaFire, including the khdump-0.2-alpha1 tool
(it's in the "Final Fantasy X, X-2, XII soft > yaz0r sorf forum backup" folder after unpacking the .7z file).
- To use it, first copy the khdump.exe to the same folder as the KINGDOM.IDX file and the ISO you made from your Kingdom Hearts disc. KHDump is a command prompt tool, but I find it easier to make a .bat script to run the extraction process. To do so, simply create a new Notepad Text Document in the same folder as the ISO, IDX and khdump.exe files. In the new Text Document, type:
khdump.exe Image.iso KINGDOM.IDX
- Make sure all the file names are the same as the ones you have in your folder
(if you named the ISO file you made from your Kingdom Hearts disc differently for example, change the Image.iso part to whatever you named it). Then save the text file and after that change the file extension of the file from .txt to .bat to make it into a batch script that can run the KHDump tool.
IMPORTANT NOTE: Many modern antivirus tools don't like .bat files and tools that do things that are out of the ordinary. So when you try to run khdump.exe or the .bat file you just created yourself, they will likely be flagged, prevented from running and immediately quarantined or deleted by your antivirus software. To prevent this, go to the settings of your particular antivirus tool, and tell it to exclude the khdump.exe and the .bat file you just created from its scans
(DO NOT turn off your antivirus tool completely of course!).
- Once you have made sure that your antivirus tool won't intervene, double-click the .bat script to run it and it will use the KHDump tool to extract all the files it can from the .iso you created from your Kingdom Hearts disc. If all went as it should, there should be hundreds of .mdls
(3D models) and .mset
(animation) files. Copy the extracted files in a separate folder for convenience.
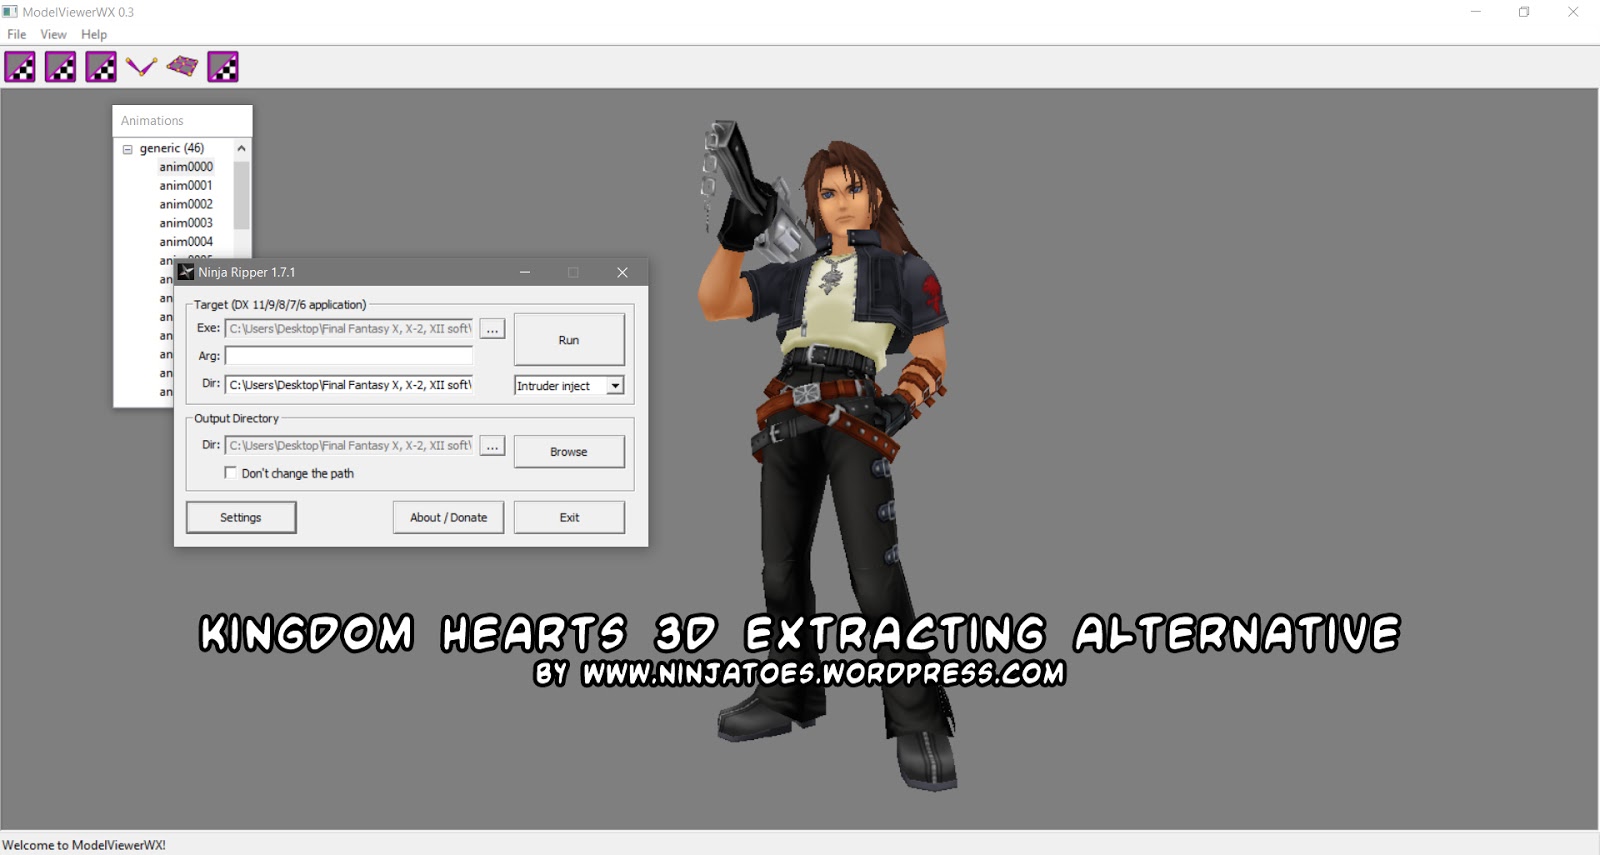
Capturing the 3D model: 3D Ripper DX + ModelViewerWX D3D9
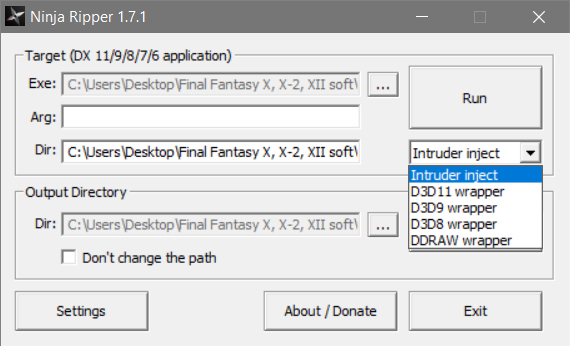
Tip: as alternative to 3D Ripper DX, you can also use Ninja Ripper which works similarly, but which won't have a distortion in the captured 3D model. I made an additional tutorial on it here: https://ninjatoes.blogspot.com/2020/02/extracting-3d-models-as-papercraft-base.html
- The tool I use to extract the Kingdom Hearts 3D models is 3D Ripper DX 1.8.2 by Roman Lut. Download it
from the original website and install it
(the password you need to enter during Setup is given to you in the first screen: ripper).
(NOTE: 3D Ripper DX outputs .3dr files for which it can automatically install a 3DR import plugin if it finds certain versions of 3DS MAX (5, 6, 7, 8, 9, 2009 or 2010 or 2011 [Design]) during setup. If you already installed 3D Ripper DX before installing 3DS MAX, you can simply run the 3D Ripper DX setup again to install the plugin).
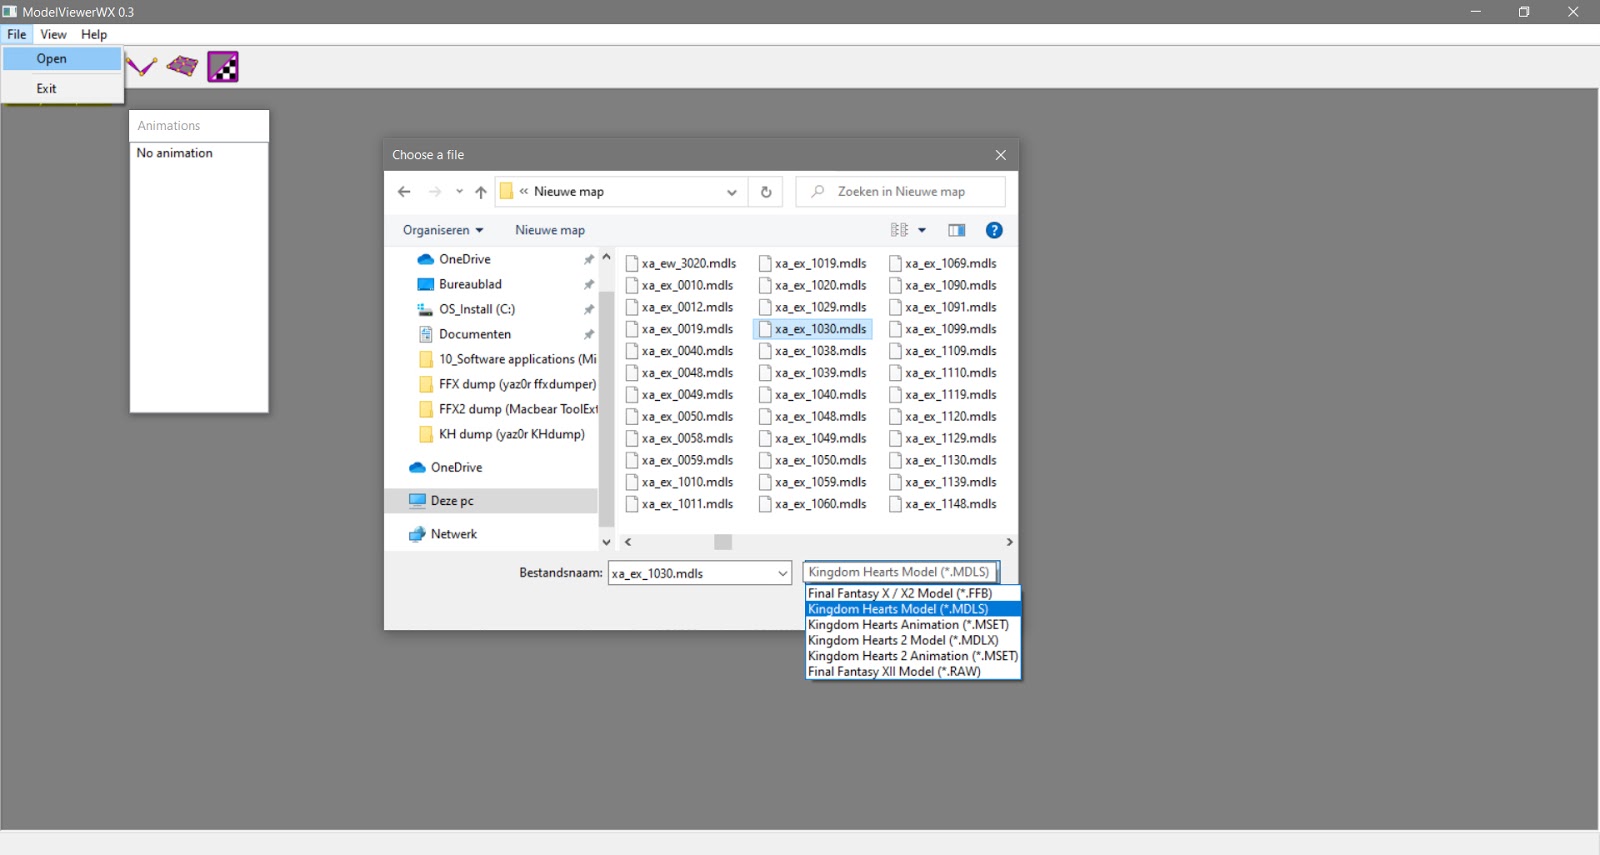
- Now find the ModelViewerWXD3D9_0.3_new folder in the same "yaz0r sorf forum backup" folder of the .7z file where you found the KHDump tool
(the folder should also include two other files: cg.dll and cgD3D9.dll). yaz0r's ModelViewerWX lets you view
(among others) Kingdom Hearts .mdls 3D model files. To extract the 3D models however, you have to start ModelViewerWX as a process through 3D Ripper DX.
- Start 3D Ripper DX and under Please select DirectX 6/8/9 application to analize, browse to the ModelViewerWXD3D9.exe file
(yaz0r also made another ModelViewerWX.exe model viewer, but you really need to use ModelViewerWXD3D9.exe because it is the DirectX9 version that works with 3D Ripper DX).
- Enable the Also capture to Waverfront .OBJ checkbox
(this is especially useful if you don't have access to 3DS MAX since Wavefront .obj file can be opened in many cheap or even free 3D programs).
- You can also customize the Frames, Textures and Shaders output directories
(by default it will create the output directories in the My Documents folder on your computer).
- Make a mental note of the Capture key
(you can change it to any of the F function keys on your keyboard, but try not to choose one that's used by the application you're trying to capture from; for yaZ0r's ModelViewerWX 0.3, the default F12 is fine).
- Now click the Launch key to start the ModelViewerWX 0.3 through 3D Ripper DX.
- When you see the yellow Ready to capture text in the top left corner of the ModelViewerWX 0.3 screen, you know everything is set up alright so far.
- Now open one of the .mdls files you extracted from the Kingdom Hearts .iso file from the file menu
(choose Kingdom Hearts Model (*.MDLS) from the dropdown menu with filetypes or they won't show up. Leon was in the xa_ex_1030.mdls file, but as you can see there are many more!)*
- Click open to view the 3D model in the model viewer. By default, you will see the standard T-pose of the model. If the .mdls file you chose has a matching set of .mset
(Kingdom Hearts animation) files though, you will also be able to select an in-game animation to have a much more interesting pose for a papercraft.
- When you have selected a pose you like, you can press the 3D Ripper DX Capture key F12
(or whatever you changed it to). When you see the screen flash, it means 3D Ripper DX has done its thing, so you can close ModelViewerWX now and find the Output folders you set in the 3D Ripper DX configuration screen.
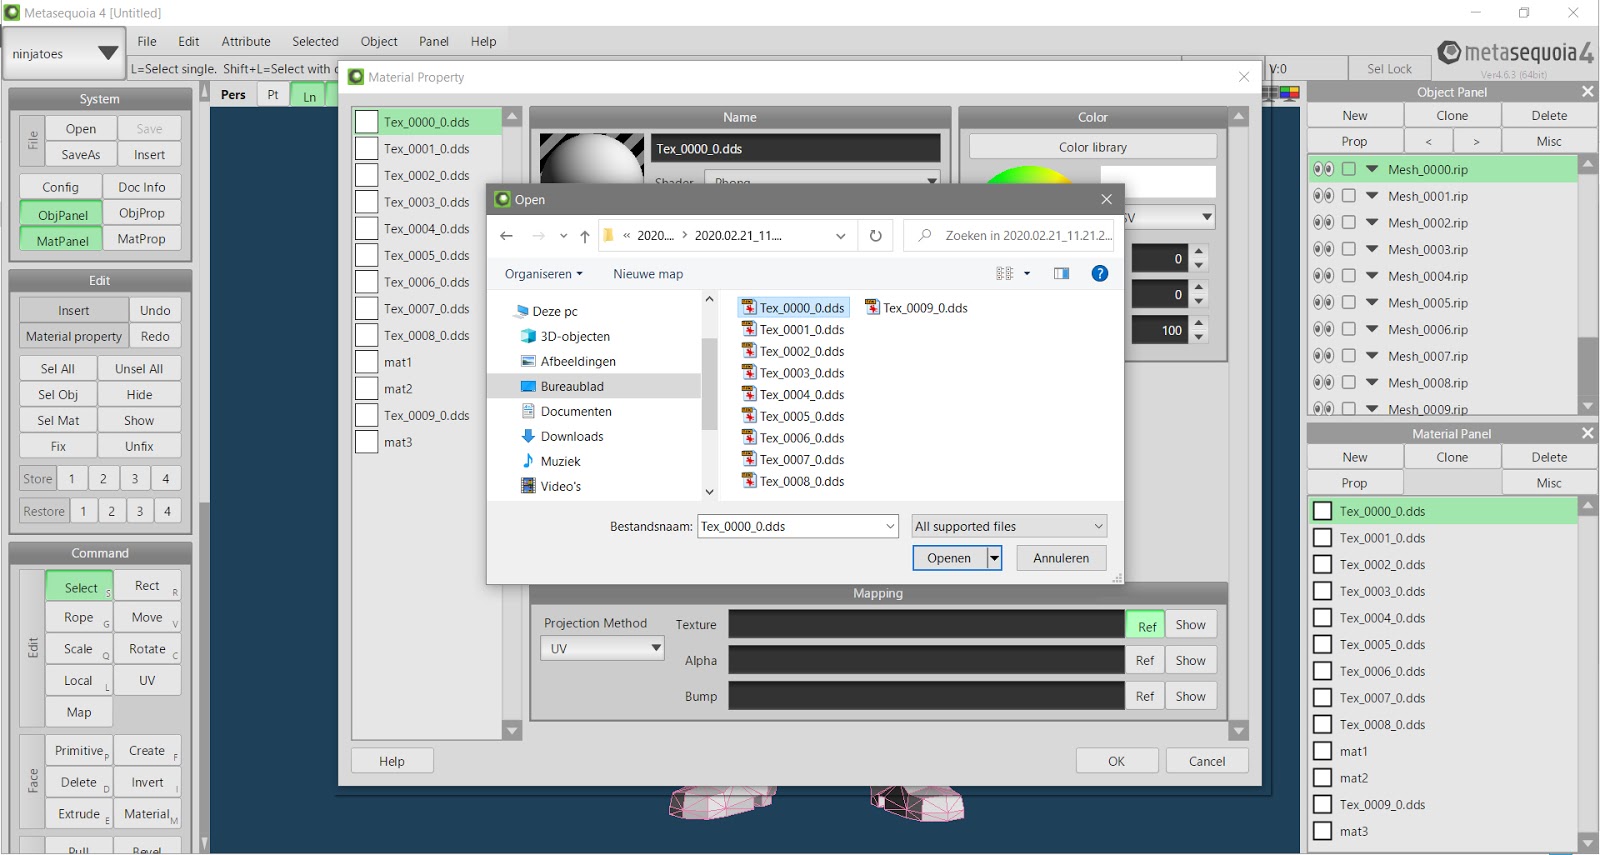
- In the 3D Reaper DX > Frames folder you will find the 3D model in both .3dr and .obj format
(the .mtl file is an additional file with texture information for the .obj file). The textures will be extracted as DirectDraw Surface .dds files to the 3D Reaper DX > Textures folder
(although many 3D programs can read .dds files, Pepakura Designer can not, so you will have to convert them to a .bmp, .jpg, .jpeg, .png, .tif, .tiff or tga image format with an image editor that can open .dds files, or a free online image convertor or a special free tool like DDS converter).
Fixing the distortion
- Normally, you could go two different ways. The first way is if you have 3DS MAX with 3D Ripper DX's 3DR Import plugin installed: then you can import the extracted .3dr file that way in 3DS MAX.
- Sometimes this has an advantage: 3D models that are extracted with 3D Ripper DX are always distorted a bit. For models extracted from some applications, the 3DS MAX 3DR Import plugin can rectify this distortion automatically by applying some Recommended values to the imported 3D model. But as you can see in the case of ModelViewerWX, the Recommended values of the 3DR Import plugin are empty, so the imported .3dr file will be just as distorted
(Leon looks kinda flat as you can see...) as the Wavefront .obj file that you extracted together with it.
(Tip for another time: Sometimes if you open an extracted .obj file from 3D Ripper DX from some applications in Notepad, you will see a line saying: "#AR=1.31483, FOV=45.14745(height), Xscale:0.54660, Yscale:0.41572, Zscale:1.0" or something like that. Those are basically the Recommended values that the 3DS MAX 3DR Import plugin looks for. This means you can also manually scale the X, Y and Z axes by the mentioned scales to correct the proportions. But in the case of ModelViewerWX, 3D Ripper DX won't be able to determine these scales and you'll see that the lines isn't there if you open the .obj file in Notepad (the example shown here is from a different file).
- Because 3DS MAX is an expensive program, most people will probably use the .obj file anyway. I like to use
Metasequoia as my 3D modelling program, because the basic functions that I use for papercrafting were easy to learn
(and are all functional in the free, unlicensed version as well) and it has an as far as I'm concerned perfect compatibility with
Pepakura Designer (it even says so on the Pepakura Designer website).
- You can really use any 3D software that can do basic modelling and that can export to any file format that
Pepakura Designer can open though:
Metasequoia .mqo or .mqoz (as said: the best combatibility) Wavefront .obj, 3D Studio .3ds, Lightwave .lwo, AutoCAD .dxf, STL binary .stl, Google Earth 4 .kmz and .kml Hexa Great .6kt and .6ks or Collada .dae.
- Fixing the distortion on a 3D model extracted with 3D Ripper DX is really as simple as opening the 3D model in Metasequoia
(or any other 3D modelling software) and scale the model in the X, Y and/or Z dimension
separately until Leon looks normal again
(the 1.500 factor is just an example; experiment with all 3 axes scales until the 3d model looks "right" to you).
- After reassigning the textures
(Metasequoia can read .dds files but Pepakura Designer can not, so remember that you will have to convert them anyway!) you will
finally have a Kingdom Hearts model that you can use as a base reference to make into a papercraft.
And that is what I will be doing next. 😊 Stay tuned!
Tools used:
- ImgBurn 2.4.0.0: http://www.oldversion.com/windows/download/imgburn-2-4-0-0 (DO NOT get the latest version from the official ImgBurn website; the newest releases are shareware and are bundled with additional software from advertisers!)
- KHDump 0.2 alpha1 + ModelViewerWX D3D9 by yaz0r: https://forum.xentax.com/viewtopic.php?t=7538 (has a link to a MediaFire archive with many other of yaz0r's tools as well)
- 3D Ripper DX 1.8.2 by Roman Lut: http://www.deep-shadows.com/hax/3DRipperDX.htm
- Metasequoia 4.7.2: http://metaseq.net/en/index.html
(If you found this "little" tutorial useful and want to save it, you can download it here as a single image)
* Addendum: It can be difficult to find the Kingdom Hearts character you want among the hundreds of extracted .mdls model files. There is a small clue in the filenames: they all start with "xa_" but the two letters after that at least tell you which world the model in that file is from:
xa_al = Aladdin's world (Agrabah)
xa_aw = Alice in Wonderland's world
xa_dc = Disney Castle
xa_dh = Dive to the Heart world (at the start of the game with the Dream Sword, Dream Shield and Dream Rod)
xa_di = Destiny Islands
xa_ew = End of the World
xa_ex = common characters and enemies throughout the game
xa_he = Hercules' world (Olympus Coliseum)
xa_lm = Little Mermaid's world (Atlantica)
xa_nm = A Nightmare Before Christmas' world (Halloween Town)
xa_pc = Princesses of Hearts' world (Hollow Bastion)
xa_pi = Pinocchio's world (Monstro)
xa_po = Winnie the Pooh's world (Hundred Acre Wood)
xa_pp = Peter Pan's world (Neverland)
xa_tw = Traverse Town
xa_tz = Tarzan's world (Deep Jungle)